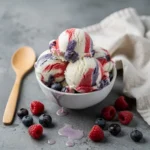
4th Of July No-Churn Red White & Blue Swirl Ice Cream Recipe (3 Ingredients)
Celebrate Independence Day with this festive 4th Of July No-Churn Red White & Blue Swirl Ice Cream Recipe. Made with just three simple ingredients, this creamy, no-churn ice cream features vibrant red, white, and blue swirls that are perfect for your holiday gathering. No ice cream maker needed—just mix, freeze, and enjoy!
Servings: 6 servings
Calories: 320kcal
Ingredients
- 2 cups heavy whipping cream, cold
- 1 (14 oz) can sweetened condensed milk
- 1 teaspoon vanilla extract
- 0.5 teaspoon red gel food coloring
- 0.5 teaspoon blue gel food coloring
Instructions
- Prep the Base: In a large chilled mixing bowl, beat the cold heavy whipping cream with an electric mixer on high speed until stiff peaks form, about 3-4 minutes. Be careful not to overbeat.
- Add Condensed Milk: Gently fold the sweetened condensed milk and vanilla extract into the whipped cream until fully combined. The mixture should be smooth and creamy.
- Divide the Mixture: Divide the ice cream base evenly into three separate bowls. Leave one bowl plain (white). Add red gel food coloring to the second bowl and blue gel food coloring to the third bowl. Gently fold the coloring into each bowl until evenly distributed.
- Layer the Colors: Line a 9x5-inch loaf pan with parchment paper. Spoon alternating dollops of red, white, and blue ice cream mixtures into the pan. Use a knife or spatula to gently swirl the colors together for a marbled effect. Avoid overmixing to keep the colors distinct.
- Freeze: Cover the loaf pan with plastic wrap or aluminum foil and freeze for at least 6 hours, or until firm. For best results, freeze overnight.
- Serve: Once frozen, scoop the ice cream into bowls or cones and enjoy your festive 4th Of July No-Churn Red White & Blue Swirl Ice Cream!
Notes
Pro Tips: For the best swirl effect, layer the colors gently and avoid overmixing. Use natural food coloring for a more vibrant look. Chill your mixing bowls beforehand to help the whipped cream hold its shape longer. If the ice cream is too hard after freezing, let it sit at room temperature for 5-10 minutes before scooping.Storage: Store in an airtight container in the freezer for up to 2 weeks. To prevent ice crystals, press plastic wrap directly onto the surface of the ice cream before sealing the container.Variations: Add mini chocolate chips or crushed cookies for extra texture. For a dairy-free version, use coconut cream instead of heavy whipping cream. Swap the vanilla extract for almond or coconut extract for a different flavor twist.