Festive Ultimate 4th of July Red, White & Blueberry Ice Cream Sandwich Cake Recipe In 240 Minutes!

Why I Created This 4th of July Red, White & Blueberry Ice Cream Sandwich Cake Recipe
I’ve always loved the idea of desserts that do double duty—delicious and decorative. A few years ago, I hosted a 4th of July party and wanted something more exciting than the usual flag cake or cupcakes. I thought, why not combine two of my favorite treats—ice cream sandwiches and layer cake—into one epic dessert? The result was this stunning ice cream sandwich cake, and it’s been a hit every summer since.
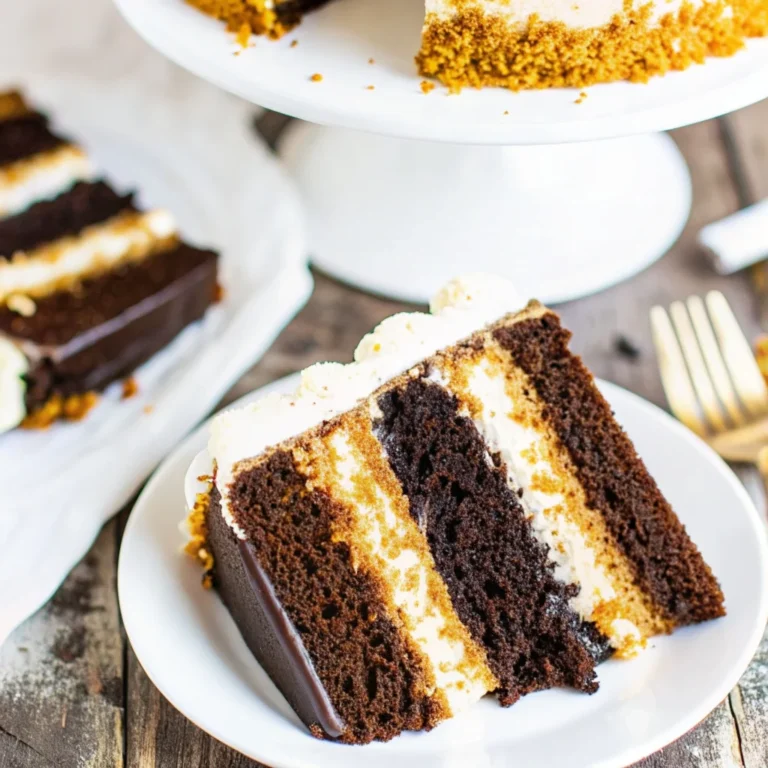
The colors of this cake are what really make it special. The deep red of the velvet cake, the bright white of the ice cream, and the vibrant blue of the blueberry compote create a dessert that’s as pretty as it is tasty. Plus, it’s a fun project to make with kids or friends. There’s something magical about assembling a cake that’s as much about the experience as it is about the eating.
I also wanted a dessert that could stand up to the heat of a summer celebration. Ice cream cakes are perfect for that—they’re refreshing, easy to serve, and always a crowd-pleaser. This recipe takes it to the next level by adding layers of texture and flavor, from the moist cake to the creamy ice cream and the burst of freshness from the blueberries. It’s a dessert that feels special, but it’s surprisingly simple to pull together.
5 Reasons You Will Love This 4th of July Red, White & Blueberry Ice Cream Sandwich Cake Recipe
First, it’s the ultimate make-ahead dessert. Since this cake needs time to freeze between layers, you can prepare it a day or two in advance. That means less stress on the day of your party and more time to enjoy the festivities with your guests.
Second, it’s a feast for the eyes. The red, white, and blue layers are so vibrant and festive, they’ll instantly become the centerpiece of your dessert table. Your guests won’t be able to resist snapping a photo before digging in.
Third, the flavors are perfectly balanced. The rich, slightly chocolatey red velvet cake pairs beautifully with the cool, creamy vanilla ice cream. The blueberry compote adds a bright, tangy contrast that cuts through the sweetness and keeps every bite interesting.
Fourth, it’s customizable. Don’t love red velvet? Swap it for a vanilla or funfetti cake. Prefer strawberry ice cream? Go for it! This recipe is a great template for whatever flavors you love, and I’ll share some of my favorite variations later in the post.
Fifth, it’s a fun project to make with others. Whether you’re baking with kids, friends, or just your partner, assembling this cake is a great way to spend time together in the kitchen. Plus, the “oohs” and “aahs” when you slice into it are totally worth the effort.
Ingredients for 4th of July Red, White & Blueberry Ice Cream Sandwich Cake Recipe
- 1 box red velvet cake mix (plus ingredients listed on the box: eggs, oil, water)
- 1/2 cup all-purpose flour (for dusting the cake pans)
- 2 cups heavy whipping cream
- 1/2 cup powdered sugar
- 1 teaspoon vanilla extract
- 1/4 teaspoon salt
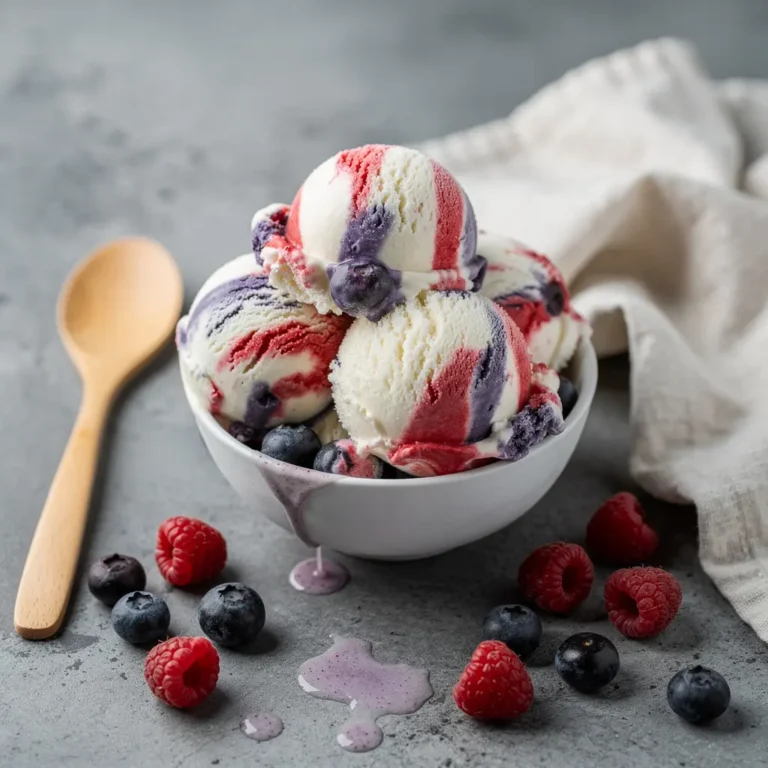
- 3 pints vanilla ice cream (softened slightly)
- 2 cups fresh blueberries
- 1/4 cup granulated sugar
- 1 tablespoon lemon juice
- 1 teaspoon cornstarch
- 1 tablespoon water
- 1/2 cup white chocolate chips (optional, for garnish)
- 1/4 cup sprinkles (optional, for garnish)
- 1/2 cup fresh raspberries (optional, for garnish)
- 1/4 cup fresh mint leaves (optional, for garnish)
- Cooking spray (for greasing the pans)
- Parchment paper (for lining the pans)
Substitutions: If you’re short on time, you can use store-bought whipped cream instead of making your own. For a lighter option, swap the heavy cream for whipped coconut cream. If you can’t find fresh blueberries, frozen will work in a pinch—just thaw and drain them before making the compote. And if you’re avoiding gluten, use a gluten-free cake mix and ensure your other ingredients are certified gluten-free.

Tools You Need to Make 4th of July Red, White & Blueberry Ice Cream Sandwich Cake Recipe
- Two 9-inch round cake pans
- Parchment paper
- Mixing bowls (large and medium)
- Electric mixer (hand or stand)
- Whisk
- Spatula
- Saucepan
- Ice cream scoop
- Plastic wrap
- Freezer-safe cake carrier or large airtight container
- Knife (for leveling the cake layers)
- Offset spatula (for spreading the ice cream)
- Serving platter
How to Make 4th of July Red, White & Blueberry Ice Cream Sandwich Cake Recipe Step by Step
Step 1: Bake the Red Velvet Cake Layers
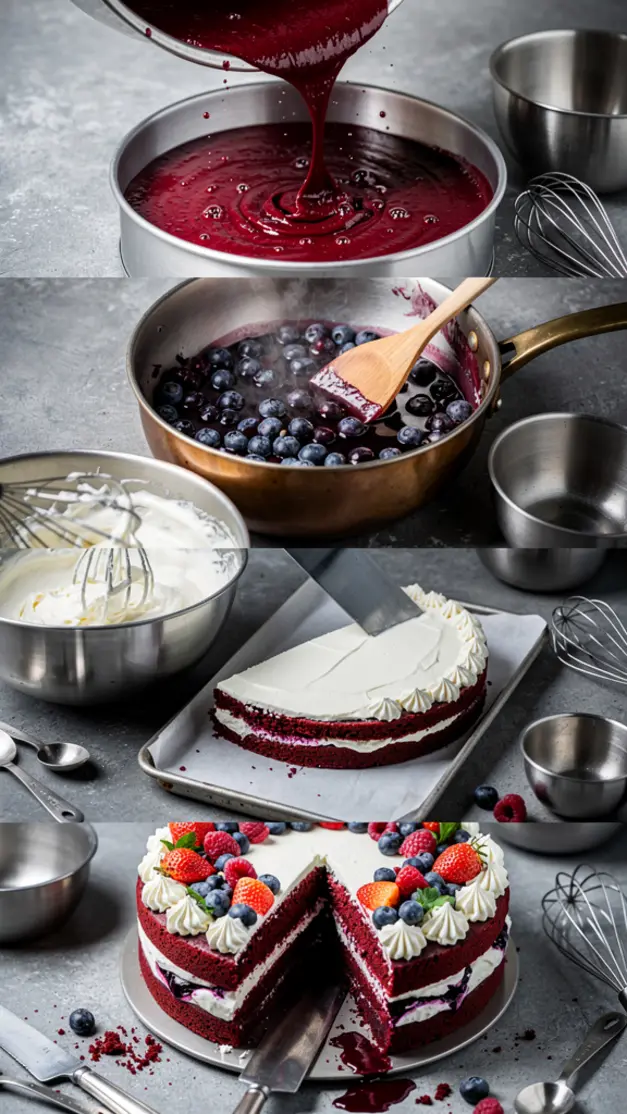
First, preheat your oven to 350°F (175°C) and grease two 9-inch round cake pans with cooking spray. Line the bottoms with parchment paper for easy removal. Dust the pans lightly with flour, tapping out any excess. This step ensures your cakes won’t stick and will come out cleanly.
Prepare the red velvet cake mix according to the package instructions, using the eggs, oil, and water listed. Divide the batter evenly between the two pans and smooth the tops with a spatula. Bake for 25-30 minutes, or until a toothpick inserted into the center comes out clean. Let the cakes cool in the pans for 10 minutes, then transfer them to a wire rack to cool completely. Once cooled, wrap each layer tightly in plastic wrap and freeze for at least 1 hour. This makes them easier to slice later.
Step 2: Make the Blueberry Compote
While the cakes are baking, it’s time to make the blueberry compote. In a saucepan, combine the blueberries, granulated sugar, and lemon juice. Cook over medium heat, stirring occasionally, until the blueberries start to burst and release their juices—about 5-7 minutes.
In a small bowl, mix the cornstarch and water to create a slurry. Stir the slurry into the blueberry mixture and cook for another 2-3 minutes, until the compote thickens. Remove from heat and let it cool completely. The compote should be thick but still pourable. If it’s too thick, stir in a little water to loosen it up. Once cooled, transfer it to a bowl and refrigerate until ready to use.
Step 3: Whip the Cream
In a large mixing bowl, combine the heavy whipping cream, powdered sugar, vanilla extract, and salt. Using an electric mixer, beat the mixture on medium-high speed until stiff peaks form—about 3-4 minutes. Be careful not to overbeat, or the cream will turn grainy. If you’re not using the whipped cream right away, cover it and refrigerate until needed.
Step 4: Assemble the Ice Cream Layers
Take one of the frozen red velvet cake layers and place it on a serving platter or cake board. If the top is domed, use a serrated knife to level it off. Spread a thin layer of whipped cream over the cake—this acts as a “glue” to help the ice cream stick. Next, scoop half of the softened vanilla ice cream onto the cake and spread it evenly with an offset spatula. Try to work quickly so the ice cream doesn’t melt too much.
Drizzle half of the blueberry compote over the ice cream layer, spreading it gently with the back of a spoon. Place the second cake layer on top and press down lightly. Repeat the layers: whipped cream, remaining ice cream, and the rest of the blueberry compote. Smooth the top with the spatula, then cover the entire cake with plastic wrap. Freeze for at least 4 hours, or until the ice cream is firm.
Step 5: Add the Final Touches
Once the cake is frozen solid, it’s time to decorate! Remove the plastic wrap and spread the remaining whipped cream over the top and sides of the cake. If you’re using white chocolate shavings, sprinkle them over the top, along with any optional garnishes like fresh raspberries, mint leaves, or sprinkles. Return the cake to the freezer for another 30 minutes to set the whipped cream.
Step 6: Slice and Serve
When you’re ready to serve, let the cake sit at room temperature for about 5-10 minutes to soften slightly. Use a sharp knife dipped in hot water to slice clean pieces. Serve immediately and enjoy the oohs and aahs as your guests see the beautiful layers!
My Pro Tips for the Best 4th of July Red, White & Blueberry Ice Cream Sandwich Cake Recipe
- Chill your mixing bowls: Before whipping the cream, pop your mixing bowl and beaters in the freezer for 10 minutes. Cold equipment helps the cream whip up faster and hold its shape better.
- Use an ice cream scoop: For even layers, use an ice cream scoop to portion out the ice cream. This ensures each slice has the perfect amount of cake and ice cream.
- Freeze between layers: Don’t skip freezing the cake between layers! This step is crucial to prevent the ice cream from melting and making a mess. Patience is key here—it’s worth the wait.
- Level your cake layers: If your cake layers are domed, take a few minutes to level them with a serrated knife. This creates a flat surface for the ice cream and makes your cake look more professional.
- Garnish with fresh berries: Right before serving, add fresh raspberries, blueberries, or mint leaves to the top of the cake. Not only does it look gorgeous, but it also adds a pop of freshness that balances the richness of the cake and ice cream.
- Work quickly: Ice cream melts fast, so have everything ready before you start assembling. Keep your ice cream in the freezer until the last possible moment, and work in a cool kitchen if you can.
Delicious Variations of 4th of July Red, White & Blueberry Ice Cream Sandwich Cake Recipe
- Strawberry Swirl: Swap the blueberry compote for a strawberry version. Cook 2 cups of diced strawberries with 1/4 cup sugar and 1 tablespoon lemon juice until thickened, then blend until smooth. Drizzle this over the ice cream layers for a pink-and-white twist.
- Funfetti Cake: Use a funfetti cake mix instead of red velvet for a more playful, colorful base. The sprinkles in the cake will add an extra festive touch to the layers.
- Chocolate Ice Cream: If you’re a chocolate lover, use chocolate ice cream instead of vanilla. The combination of red velvet cake and chocolate ice cream is decadent and delicious.
- Gluten-Free: Make this cake gluten-free by using a gluten-free cake mix and ensuring all your other ingredients (like the ice cream and whipped cream) are certified gluten-free. The texture will be just as delicious!
- Boozy Blueberry: For an adults-only version, stir 1-2 tablespoons of vodka or blueberry liqueur into the blueberry compote. The alcohol won’t freeze solid, so the compote will stay slightly saucy.
- Cookie Crunch: Add a layer of crushed Oreos or chocolate chip cookies between the ice cream and cake layers for extra crunch and flavor.
What to Serve With 4th of July Red, White & Blueberry Ice Cream Sandwich Cake Recipe
This cake is rich and decadent, so it pairs well with lighter, refreshing sides. A simple fruit salad with watermelon, berries, and mint is a great way to balance the sweetness. You could also serve it with a platter of fresh berries and a drizzle of honey for a more elegant touch.
For drinks, think about what you’d serve at a summer barbecue. Iced tea, lemonade, or a sparkling berry spritzer are all great choices. If you’re serving alcohol, a light rosé or a fruity sangria would complement the cake beautifully. And don’t forget the coffee—it’s a great way to end the meal on a cozy note.
If you’re hosting a full 4th of July spread, this cake would be right at home alongside classic picnic foods like grilled burgers, hot dogs, and corn on the cob. It’s also a fun dessert to serve after a seafood boil or a backyard barbecue with ribs and coleslaw.
How to Store Leftover 4th of July Red, White & Blueberry Ice Cream Sandwich Cake Recipe
This cake is best served the day it’s made, but if you have leftovers, they’ll keep well in the freezer. Wrap the entire cake (or individual slices) tightly in plastic wrap, then place it in an airtight container. It will stay fresh for up to 1 week. When you’re ready to serve, let it sit at room temperature for 5-10 minutes to soften slightly before slicing.
If you’re storing individual slices, you can wrap them in parchment paper and place them in a freezer bag. This makes it easy to grab a single serving whenever you’re craving a sweet treat. Just remember to let the slices thaw for a few minutes before eating—they’ll be easier to enjoy that way.
Avoid storing the cake in the refrigerator, as the humidity can cause the ice cream to develop ice crystals and the cake to become soggy. The freezer is definitely the way to go!
Frequently Asked Questions About 4th of July Red, White & Blueberry Ice Cream Sandwich Cake Recipe
- Can I make this cake ahead of time? Absolutely! In fact, I recommend making it at least a day in advance so the layers have time to set. Just be sure to store it in the freezer until you’re ready to serve.
- Can I use store-bought whipped cream? Yes, you can. However, homemade whipped cream is lighter and tastes fresher, so I recommend making your own if you have the time. If you do use store-bought, opt for a high-quality brand without stabilizers for the best texture.
- What if I don’t have an offset spatula? No problem! A regular butter knife or a small spatula will work just fine for spreading the ice cream and whipped cream. Just be gentle to avoid tearing the cake layers.
- Can I use a different flavor of ice cream? Of course! This recipe is very versatile. Strawberry, blueberry, or even cookies-and-cream ice cream would all work beautifully. Just keep in mind that the colors might not be as patriotic if you stray too far from vanilla.
- How do I prevent the ice cream from melting while assembling? The key is to work quickly and keep everything as cold as possible. Freeze your cake layers before assembling, and keep the ice cream in the freezer until the last minute. If your kitchen is warm, consider working near a fan or in short bursts to minimize melting.
- Can I make this cake without a cake mix? Yes! If you prefer to make the red velvet cake from scratch, go for it. Just be sure to adjust the baking time as needed, since homemade cake layers may bake differently than boxed mixes.
- How do I slice the cake cleanly? Dip a sharp knife in hot water and wipe it dry before each slice. This helps the knife glide through the frozen layers without tearing the cake. For the neatest slices, cut the cake while it’s still frozen solid.
The Story Behind My 4th of July Red, White & Blueberry Ice Cream Sandwich Cake Recipe
I’ll never forget the first time I made this cake. It was for a small gathering of friends on the 4th of July, and I wanted to create something that felt special but wasn’t too fussy. I’d been experimenting with ice cream cakes for a while, but I wanted to take it up a notch with layers and colors that really popped. The red velvet cake was an obvious choice—it’s rich, moist, and the perfect shade of red. The vanilla ice cream added that classic, creamy contrast, and the blueberry compote tied everything together with a burst of freshness.
What I didn’t expect was how much fun everyone had eating it. The layers were a surprise to my guests, and the combination of flavors and textures got rave reviews. One friend even said it was the best dessert she’d ever had at a summer party. That’s when I knew this recipe was a keeper.
Over the years, I’ve tweaked the recipe to make it even better. I’ve added whipped cream between the layers to act as a “glue,” and I’ve experimented with different garnishes to make it look as good as it tastes. But the heart of the recipe remains the same: a celebration of summer, friendship, and the simple joy of sharing good food with the people you love.
This cake has become a tradition in my family. Every 4th of July, my kids help me assemble it, and we always end up with blueberry-stained fingers and big smiles. It’s more than just a dessert—it’s a memory in the making. And that’s what I love most about cooking: the way food brings people together and creates moments that last a lifetime.
Pin This 4th of July Red, White & Blueberry Ice Cream Sandwich Cake Recipe for Later
I hope this 4th of July Red, White & Blueberry Ice Cream Sandwich Cake becomes a favorite in your home, just like it has in mine. Whether you’re hosting a big party or just celebrating with your family, this cake is sure to impress. The best part? It’s as fun to make as it is to eat. So gather your ingredients, put on some music, and get ready to create something truly special.
And when you do make it, I’d love to hear how it turns out! Drop a comment below or tag me in your photos. There’s nothing I love more than seeing how you put your own spin on my recipes. Happy baking, and here’s to a delicious and festive 4th of July!

4th of July Red, White & Blueberry Ice Cream Sandwich Cake Recipe
Ingredients
- 2 cups all-purpose flour
- 1.5 cups granulated sugar
- 1 tsp baking soda
- 1 tsp salt
- 1 tsp cocoa powder
- 1 cup buttermilk
- 1/2 cup vegetable oil
- 2 large eggs
- 2 tsp vanilla extract
- 1 oz red food coloring
- 1 tsp white vinegar
- 1.5 quarts vanilla ice cream, slightly softened
- 2 cups fresh blueberries
- 1/4 cup granulated sugar
- 1 tbsp lemon juice
- 1 tsp cornstarch
- 1 cup heavy whipping cream
- 2 tbsp powdered sugar
- 1 tsp vanilla extract
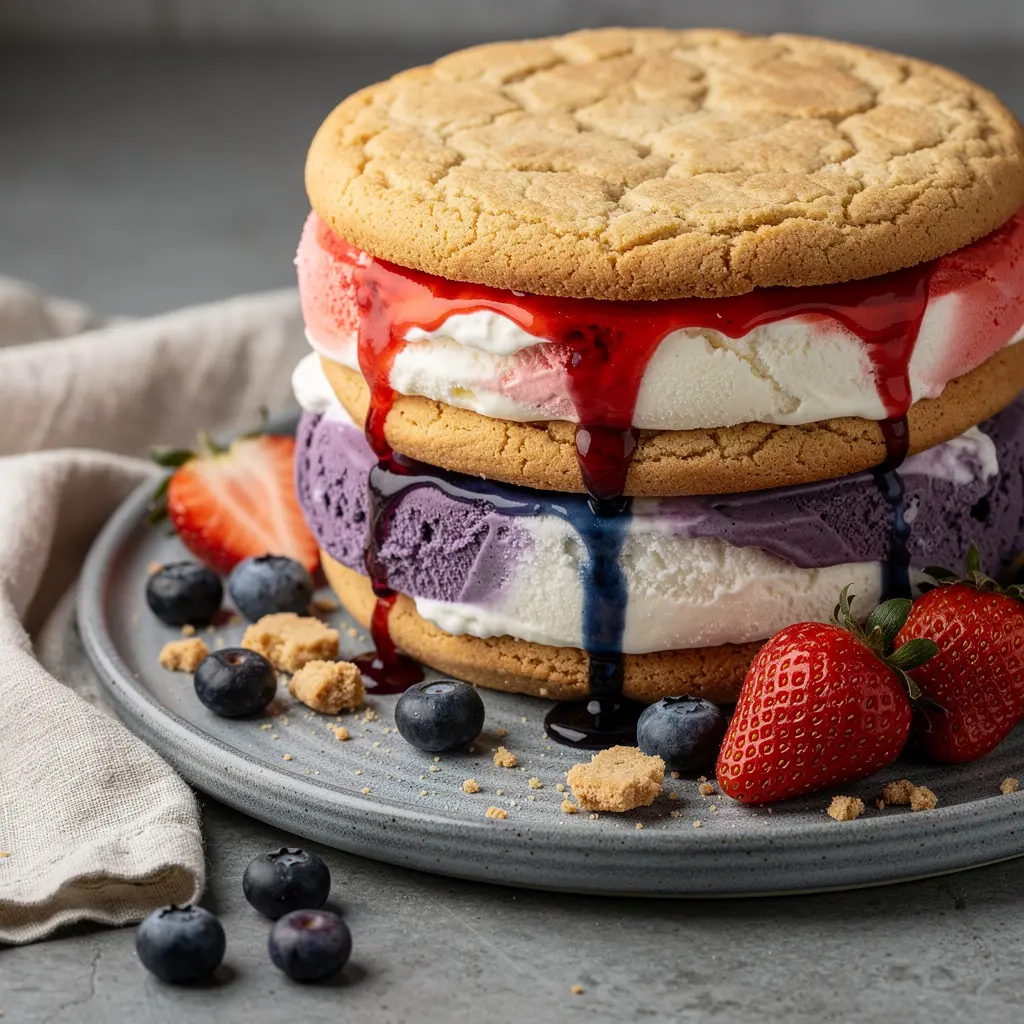
- 12 store-bought vanilla ice cream sandwiches
Instructions
- Prep the Red Velvet Cake: Preheat your oven to 350°F (175°C). Grease and line two 9-inch round cake pans with parchment paper.
- In a medium bowl, whisk together the flour, sugar, baking soda, salt, and cocoa powder. Set aside.
- In another bowl, mix the buttermilk, vegetable oil, eggs, vanilla extract, red food coloring, and white vinegar until well combined.
- Gradually add the dry ingredients to the wet ingredients, mixing just until combined and smooth.
- Divide the batter evenly between the prepared cake pans. Bake for 25-30 minutes, or until a toothpick inserted into the center comes out clean. Allow the cakes to cool completely in the pans, then transfer to a wire rack.
- Prepare the Blueberry Compote: In a small saucepan, combine 1.5 cups of blueberries, 1/4 cup sugar, lemon juice, and cornstarch. Cook over medium heat, stirring frequently, until the mixture thickens (about 5-7 minutes). Remove from heat and let it cool. Stir in the remaining 0.5 cup of blueberries.
- Whip the Cream: In a chilled bowl, whip the heavy cream, powdered sugar, and vanilla extract until stiff peaks form. Set aside.
- Assemble the Cake: Place one red velvet cake layer on a 9-inch round cake board or plate. Spread a layer of slightly softened vanilla ice cream evenly over the cake. Top with half of the blueberry compote. Place the second cake layer on top.
- Spread the remaining vanilla ice cream over the top cake layer. Drizzle the remaining blueberry compote on top. Freeze the cake for 1 hour to set.
- Remove the cake from the freezer and spread the whipped cream evenly over the top and sides. Arrange the ice cream sandwiches vertically around the sides of the cake, pressing gently to adhere.
- Return the cake to the freezer and freeze for at least 3 hours, or until firm. Slice and serve chilled.