Easy Cheesy Garlic Chicken Wraps (Perfect Make-Ahead Lunch!) 20 Minutes
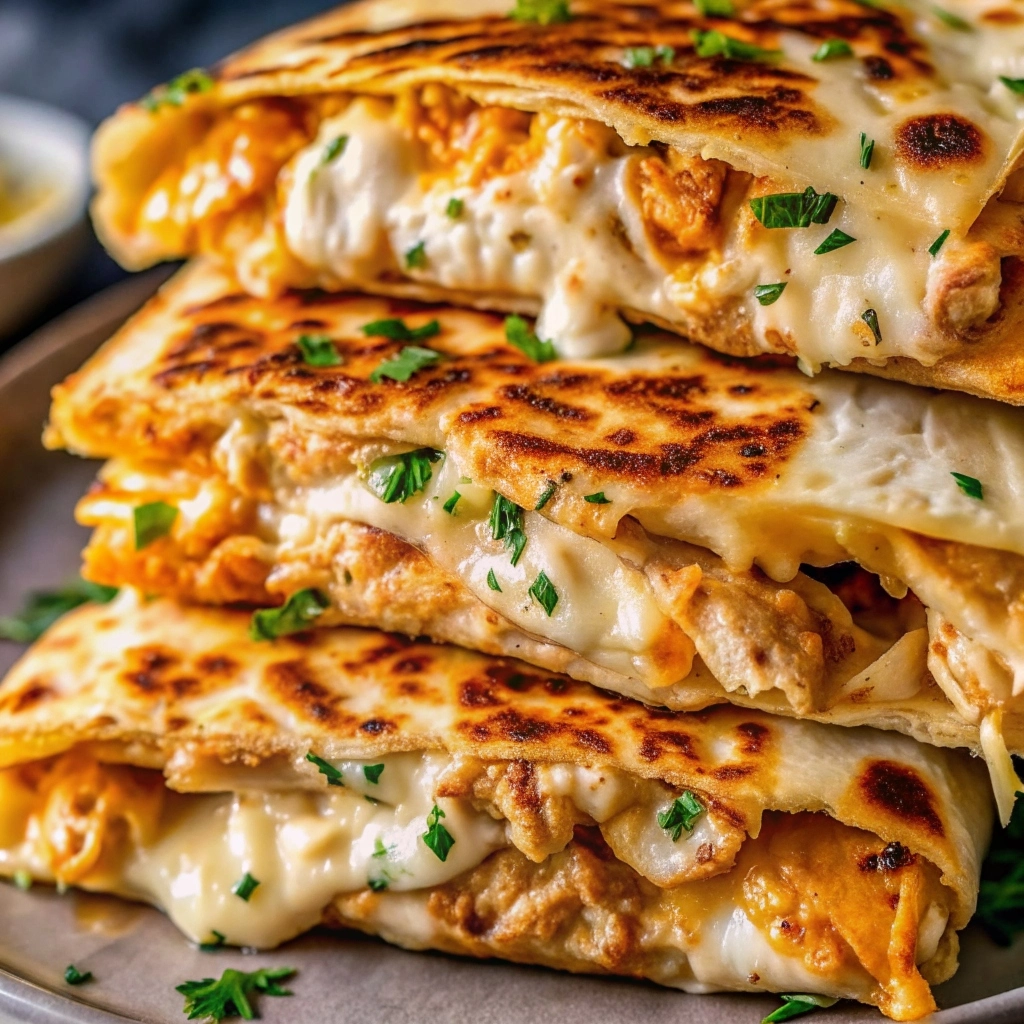
Table of Contents
Easy Cheesy Garlic Chicken Wraps (Perfect Make-Ahead Lunch!)
Tired of the same old sandwiches for lunch? These Cheesy Garlic Chicken Wraps are here to revolutionize your midday meal. Imagine tender, shredded chicken enveloped in a creamy, three-cheese blend, all seasoned with bold garlic, wrapped in a soft tortilla, and toasted to golden, crispy perfection. This easy lunch recipe comes together in just 20 minutes, makes excellent use of leftover or rotisserie chicken, and is a fantastic make-ahead lunch option for busy weeks. They’re a guaranteed upgrade that delivers restaurant-level flavor with minimal effort.
The competitor’s recipe is a great foundation, but our version streamlines the process and provides expert techniques for achieving the perfect texture—a creamy, cohesive filling that doesn’t leak and a wrap that toasts evenly without burning. We’ll show you how to master the tight roll and the perfect toast for a quick lunch that doesn’t sacrifice any satisfaction.
Why These Are the Best Lunch Wraps
This recipe is designed for real life. It’s incredibly quick—ready in the time it takes to wait for delivery. It’s highly customizable—easily add your favorite veggies or adjust the spice level. It travels perfectly for work or school, and it can be prepared in advance, taking the stress out of your morning routine.
Key Ingredients for Maximum Flavor
Using a few quality ingredients makes all the difference in this simple dish.
For the Creamy Garlic Chicken Filling:
- 2 cups Cooked, Shredded Chicken: A rotisserie chicken is the ultimate shortcut.
- 1 ½ cups Shredded Mozzarella Cheese: For that perfect, stretchy melt.
- ½ cup Shredded Sharp Cheddar Cheese: Adds a tangy depth of flavor.
- ¼ cup Cream Cheese, softened: The secret to a rich, creamy, cohesive filling.
- 2 tbsp Mayonnaise or Greek Yogurt: Adds tang and helps bind everything.
- 1 tsp Garlic Powder & 1-2 cloves Fresh Garlic, minced: Use both for layered garlic flavor.
- ½ tsp Onion Powder, ½ tsp Dried Parsley (or 2 tbsp fresh), Salt & Pepper
For Assembling & Toasting:
- 4 Large Burrito-Size Flour Tortillas (10-inch)
- 2 tbsp Butter, melted
- 1 clove Garlic, minced (for the garlic butter brush)
Optional Add-Ins:
- Handful of fresh spinach or arugula
- Diced tomatoes or roasted red peppers
- A dash of hot sauce or red pepper flakes in the filling
Step-by-Step Instructions
Follow these simple steps for the perfect wrap every time.
Step 1: Make the Creamy Filling
In a large bowl, combine the softened cream cheese and mayonnaise (or Greek yogurt). Stir until smooth. This is the base of your creamy filling. Add the shredded chicken, mozzarella, cheddar, garlic powder, minced fresh garlic, onion powder, parsley, salt, and pepper. Mix until everything is evenly coated and the mixture holds together.
Step 2: Assemble the Wraps
Lay a tortilla flat. Spoon about ¾ cup of the chicken mixture in a line across the center, leaving a 2-inch border at the sides. If adding spinach or tomatoes, place them on top of the filling. Fold the sides of the tortilla inward over the ends of the filling, then roll tightly from the bottom edge away from you, forming a tight cylinder. Repeat.
Step 3: Brush with Garlic Butter & Toast
In a small bowl, mix the melted butter and the minced garlic clove. Heat a non-stick skillet or griddle over medium heat. Generously brush the top of each wrap with the garlic butter. Place the wrap butter-side down in the skillet. Brush the top side with more garlic butter. Cook for 3-4 minutes per side, pressing down gently with a spatula, until the tortilla is golden brown and crispy and you can hear the cheese sizzling inside.
Step 4: Cool, Slice & Serve
Let the wraps rest for 2 minutes on a cutting board (this helps the filling set). Slice each wrap in half on a diagonal. Serve immediately with sides like a simple salad, carrot sticks, or a side of ranch for dipping.
Expert Tips for Lunch-Perfect Wraps
- Dry Your Chicken: If using rotisserie chicken, pat the shredded meat lightly with a paper towel. Excess moisture can make the filling watery and the tortilla soggy.
- The Tight Roll is Key: A loose wrap will fall apart. Roll as tightly as possible without tearing the tortilla. Seam-side down first in the pan helps seal it.
- Don’t Skip the Garlic Butter Brush: This transforms the plain tortilla into a crispy, flavor-packed exterior that tastes like garlic bread.
- Medium Heat for Golden Perfection: Too high, and the outside burns before the cheese melts; too low, and the wrap will be pale and greasy.
- Make-Ahead Magic: Assemble the wraps (without toasting), wrap each tightly in parchment paper and then foil. Refrigerate for up to 24 hours or freeze for 1 month. Toast from refrigerated (add 1-2 mins) or thawed state.
What to Pack for Lunch & More Easy Lunch Ideas
Love this easy, portable lunch? It’s a star in our meal prep recipes collection. For another fantastic make-ahead lunch that’s also cold and creamy, try our Easy Crack Chicken Pinwheels. If you’re looking for a different handheld favorite, our Ultimate Chopped Chicken Bacon Ranch Sub is always a hit. And to see another great take on this concept, check out the original Cheesy Garlic Chicken Wraps recipe from My Home Made Meal.
Frequently Asked Questions (FAQs)
Can I use different cheeses?
Absolutely! Monterey Jack, Pepper Jack (for spice), Colby, or even a sprinkle of Parmesan in the filling all work wonderfully.
How do I reheat these wraps for lunch?
The best method is a toaster oven or conventional oven at 350°F for 10-12 minutes to re-crisp the tortilla. The microwave (30-60 seconds) will heat the filling but make the tortilla soft.
Can I make these vegetarian?
Yes! Substitute the chicken with 1 (15 oz) can of black beans (rinsed and mashed slightly), or use 2 cups of sautéed chopped mushrooms or zucchini.
My wrap is leaking cheese. What happened?
This usually means the wrap wasn’t rolled tightly enough, the heat was too high causing the cheese to melt too rapidly, or it was overfilled. Aim for a tight roll and don’t overstuff.
Are these wraps freezer-friendly?
Yes! Assemble and wrap them tightly (untoasted) as described in the make-ahead tip. Freeze for up to 1 month. Thaw overnight in the fridge before toasting as directed.

Cheesy Garlic Chicken Wraps
Equipment
- Mixing Bowl
- Non-Stick Skillet or Griddle
- Pastry Brush
Ingredients
- 2 cups cooked, shredded chicken (rotisserie chicken is perfect)
- 1.5 cups shredded mozzarella cheese
- 0.5 cup shredded sharp cheddar cheese
- 0.25 cup cream cheese, softened
- 2 tbsp mayonnaise or plain Greek yogurt
- 1 tsp garlic powder
- 1-2 cloves garlic, minced
- 0.5 tsp onion powder
- 2 tbsp chopped fresh parsley (or ½ tsp dried)
- to taste salt and black pepper
- 4 large (10-inch) flour tortillas
- 2 tbsp butter, melted
- 1 clove garlic, minced (for butter)
Instructions
- In a bowl, mix cream cheese and mayo until smooth. Add chicken, cheeses, garlic powder, minced garlic, onion powder, parsley, salt, and pepper. Combine well.
- Divide filling among tortillas, placing it in a line down the center. Fold in sides and roll up tightly from the bottom.
- Mix melted butter with minced garlic. Brush over wraps. Cook in a skillet over medium heat for 3-4 mins per side until golden and crispy.
- Let rest 2 mins, slice in half, and serve warm.