Shamrock Shake Pudding Cups – Easy & Festive in 15 Minutes!
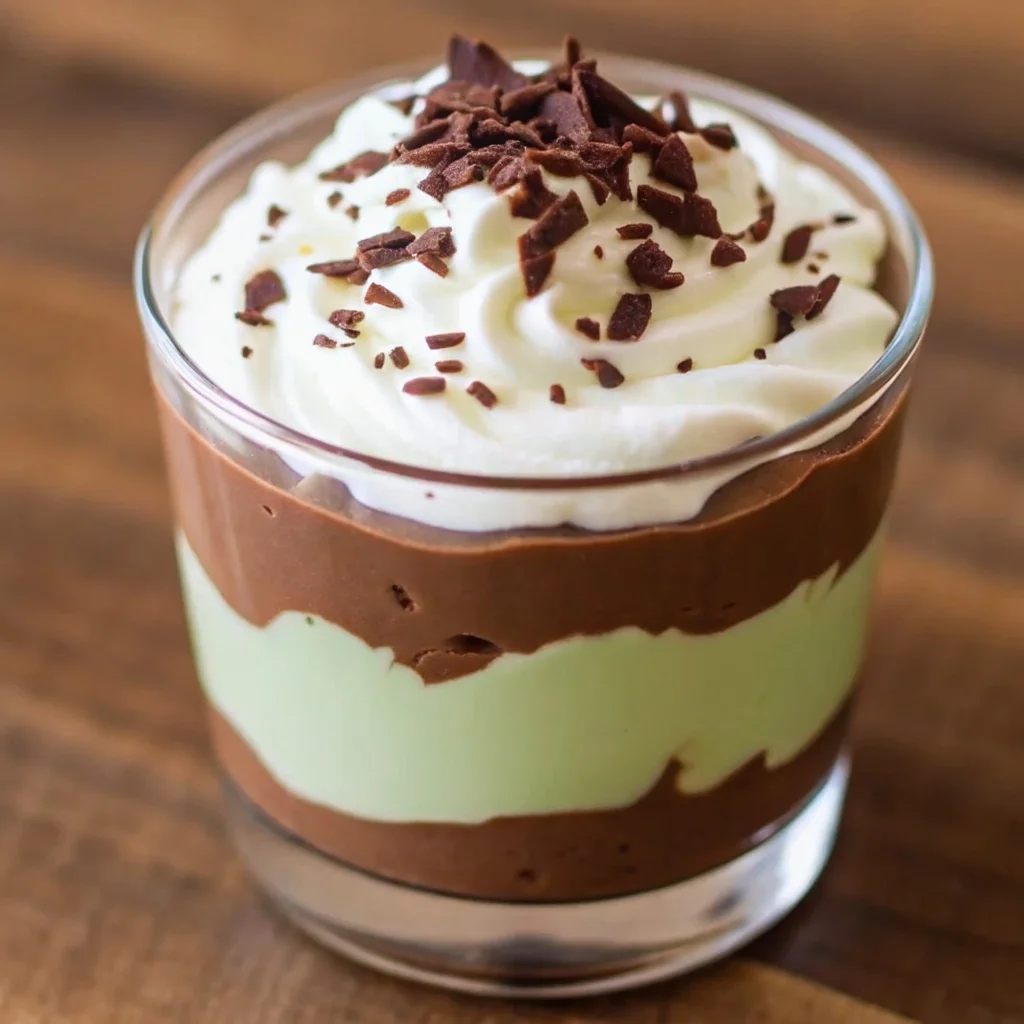
Table of Contents
The Magically Easy Dessert That Brings the Shamrock Shake Home
What if you could capture the iconic, minty-creamy joy of a seasonal fast-food shake in a dessert that’s even easier to make and serve to a crowd? These Shamrock Shake Pudding Cups are exactly that—a brilliant, no-bake treat that turns the beloved flavor into a stunning, layered dessert you can make in about 15 minutes. By using simple instant pudding mixes, you create distinct layers of rich chocolate and vibrant, cool mint that look absolutely magical in clear cups. Topped with a cloud of whipped cream and festive sprinkles, they’re a handheld celebration of St. Patrick’s Day that’s as fun to look at as it is to eat. Whether you’re hosting a classroom party, need a last-minute potluck contribution, or just want to bring a little green cheer to your family table, this recipe is your foolproof path to a delicious, stress-free dessert that delights both kids and adults.
Why These Pudding Cups Are Your New Holiday Go-To
- 15-Minute Miracle: With zero cooking and just a bit of whisking, you can have these assembled and ready to chill in the time it takes to watch a TV show. It’s the ultimate fast, impressive dessert.
- No-Bake & No-Fuss: No oven, no stove, no complicated techniques. This recipe is perfect for hot days, tiny kitchens, or cooks of absolutely any skill level (a great project for kids!).
- Built-In Portion Control: Individual servings mean no slicing or scooping at party time. They’re easy to grab, easy to eat, and look abundant on a dessert table.
- Visually Stunning: The clean layers in clear cups create a “wow” factor that makes them look like they came from a professional bakery, with minimal effort from you.
- Endlessly Customizable: Start with the classic chocolate-mint duo, then get creative with mix-ins, garnishes, and even adult-friendly additions to make it your own.
Gathering Your Simple, Festive Ingredients
- 1 package (3.4 oz) instant chocolate pudding mix
- 1 package (3.4 oz) instant vanilla pudding mix
- 4 cups cold milk, divided
- ½ – 1 teaspoon pure mint extract (or peppermint extract, to taste)
- Green gel food coloring
- 1 cup whipped topping (like Cool Whip), thawed, OR freshly whipped cream
- For garnish: Chocolate shavings, crushed Oreos, green sprinkles, Andes mint pieces, or maraschino cherries
Smart Swaps & Tips: If you can find instant mint chocolate chip or plain mint pudding mix, you can use that instead of the vanilla + extract combo for an even quicker start. Gel food coloring gives the most vibrant green without thinning the pudding. For a dairy-free version, use your favorite plant-based milk and non-dairy whipped topping. To make the layers extra clean, you can use a piping bag or a zip-top bag with the corner snipped off to add the pudding.

Your 15-Minute Guide to Layered Pudding Perfection
- Prep Your Cups: Get out 6-8 clear plastic cups, small mason jars, or dessert glasses. This is your canvas!
- Make the Chocolate Pudding: In a medium bowl, whisk the chocolate pudding mix with 2 cups of cold milk for 2 minutes until it begins to thicken. Set aside.
- Make the Mint Pudding: In another bowl, whisk the vanilla pudding mix with the remaining 2 cups of cold milk for 2 minutes. Add the mint extract and green food coloring (start with 4-5 drops) and whisk until fully combined and your desired shade of green is reached.
- Create the Layers: Now for the fun part! Into each cup, spoon or pipe a layer of chocolate pudding. Gently top with a layer of the green mint pudding. For a taller, more dramatic look, you can repeat the layers once more.
- Chill to Set: Place the cups in the refrigerator for at least 30 minutes (or up to a day ahead) to allow the puddings to fully set.
- Top & Serve: Just before serving, add a dollop or piped swirl of whipped topping to each cup. Garnish with your choice of toppings—chocolate shavings and a sprinkle of green jimmies are classic!
Pro Tips & Flavor Variations
- The Chill is Key: Don’t skip the chilling time. It allows the layers to firm up so they stay distinct when you eat them and intensifies the flavors.
- Make-Ahead Marvel: You can layer the puddings in the cups, cover them with plastic wrap, and refrigerate for up to 24 hours. Add the whipped cream and garnish right before serving.
- Add Some Crunch: For a fantastic texture contrast, add a layer of crushed chocolate cookies, brownie bits, or even crushed pretzels between the pudding layers.
- “Shamrock Shake” Authenticity: For a flavor that truly mimics the classic shake, add 1-2 teaspoons of vanilla extract to the green mint pudding along with the mint.
- Adult-Only Upgrade: Stir a splash of Irish cream liqueur or crème de menthe into the green pudding layer for a boozy twist (serve to adults only, of course).
Serving Suggestions for a Lucky Spread
These cups are the perfect sweet ending to any St. Patrick’s Day meal. Arrange them on a tray lined with green paper shred or a shamrock-print napkin for extra festivity. They pair wonderfully with other green treats. For another incredibly easy, no-bake St. Patrick’s Day dessert, try our Lucky Charm Cereal Bars. To serve a crowd, consider making a large trifle version in a clear bowl using the same layering method.
Nutrition Information
(Per cup, approx.) Calories: 210 | Carbohydrates: 35g | Protein: 5g | Fat: 6g | Saturated Fat: 4g | Fiber: 1g | Sugar: 28g. This is a sweet, fun dessert.
Storage & Reheating Instructions
- Storage: Keep the assembled cups (without whipped cream garnish) covered with plastic wrap in the refrigerator for up to 3 days.
- Make-Ahead: This dessert is designed to be made ahead! The pudding layers can be made 1-2 days in advance. Add whipped cream and garnishes within a few hours of serving.
- Freezing: Not recommended, as the pudding’s texture will become watery and grainy upon thawing.
Your Shamrock Pudding Cup Questions, Answered
- I can’t find mint pudding mix. What can I do?
No problem! That’s why the recipe above uses vanilla pudding mix + mint extract. It’s actually better because you can control the mint intensity. Start with ½ tsp of extract, taste, and add more if you like it stronger. - My layers are mixing together. How do I keep them separate?
Make sure each pudding layer has had its 2-minute whisking time to begin thickening before you layer. Also, spoon or pipe the second layer gently on top; don’t pour or drop it. Chilling the first layer for 10 minutes before adding the second can also help. - Can I make this in one big bowl instead of cups?
Absolutely! You can create a beautiful Shamrock Pudding Trifle in a large clear bowl. Just layer the puddings, maybe with some whipped cream in between, and garnish the top. - What’s the best way to get clean layers with a piping bag?
Fit a piping bag (or sturdy zip-top bag) with a large round tip. Fill it with one pudding. Squeeze gently to create an even layer. Rinse the bag or use a new one for the second pudding color. - Can I use sugar-free pudding mix?
Yes, sugar-free pudding mixes work perfectly with this method. Follow the same instructions on the box, using the same amount of milk.

More Incredible St. Patrick’s Day & No-Bake Treats You’ll Love
If these easy, festive cups become a hit, you’ll want to explore our other no-bake holiday recipes. For a richer mint-chocolate option, our Andes Mint Mini Cheesecakes are always adored. If you’re looking for a fun treat to make with kids, our St. Patrick’s Day Brownie Trifle dyed green are always popular and is a showstopping centerpiece.
Inspired by the Fun of No-Fuss Holiday Treats
This recipe is inspired by the joy of creating festive, memorable desserts without any baking stress. It celebrates the iconic flavors of the season and presents them in a simple, shareable, and visually delightful format. The focus is on quick assembly, make-ahead convenience, and customizable fun, proving that holiday magic can be effortless, much like the approach in the cheerful and easy Shamrock Shake Pudding Cups recipe from Pepper Basil.
Pin This Festive & Easy Dessert!
Don’t let this foolproof, crowd-pleasing recipe get lost! Click the Pinterest save button to keep these Shamrock Shake Pudding Cups on your “St. Patrick’s Day” or “No-Bake Desserts” board. When you make them, share your colorful creations with us by tagging @theseasonrecipe on Instagram. For more winning holiday recipes, browse our full collection of easy sweets and party ideas!

Shamrock Shake Pudding Cups
Equipment
- Clear Cups or Small Jars To showcase the beautiful layers.
Ingredients
- 1 box (3.4 oz) instant chocolate pudding mix
- 1 box (3.4 oz) instant vanilla pudding mix
- 4 cups cold milk, divided
- 0.5 tsp pure mint extract (or to taste)
- as needed green gel food coloring
- 1 cup whipped topping or freshly whipped cream
- for garnish chocolate shavings, sprinkles, or mint candies
Instructions
- Gather 6-8 clear cups or small jars. In a bowl, whisk chocolate pudding mix with 2 cups of cold milk for 2 minutes until it thickens. Set aside.
- In another bowl, whisk vanilla pudding mix with the remaining 2 cups of cold milk for 2 minutes. Add mint extract and green food coloring; whisk until fully combined and green.
- Into each clear cup, add a layer of chocolate pudding. Gently top with a layer of the green mint pudding. For taller cups, repeat the layers.
- Place the cups in the refrigerator to chill and set for at least 30 minutes (or up to 24 hours).
- Just before serving, top each cup with a dollop or swirl of whipped cream. Garnish with chocolate shavings, sprinkles, or mint candies.