
Easy Espresso Brownies – Rich, Fudgy, with Bold Coffee Flavor! (1 Hour Prep Time)

Table of Contents
Easy Espresso Brownies: Rich, Fudgy, and Perfectly Balanced
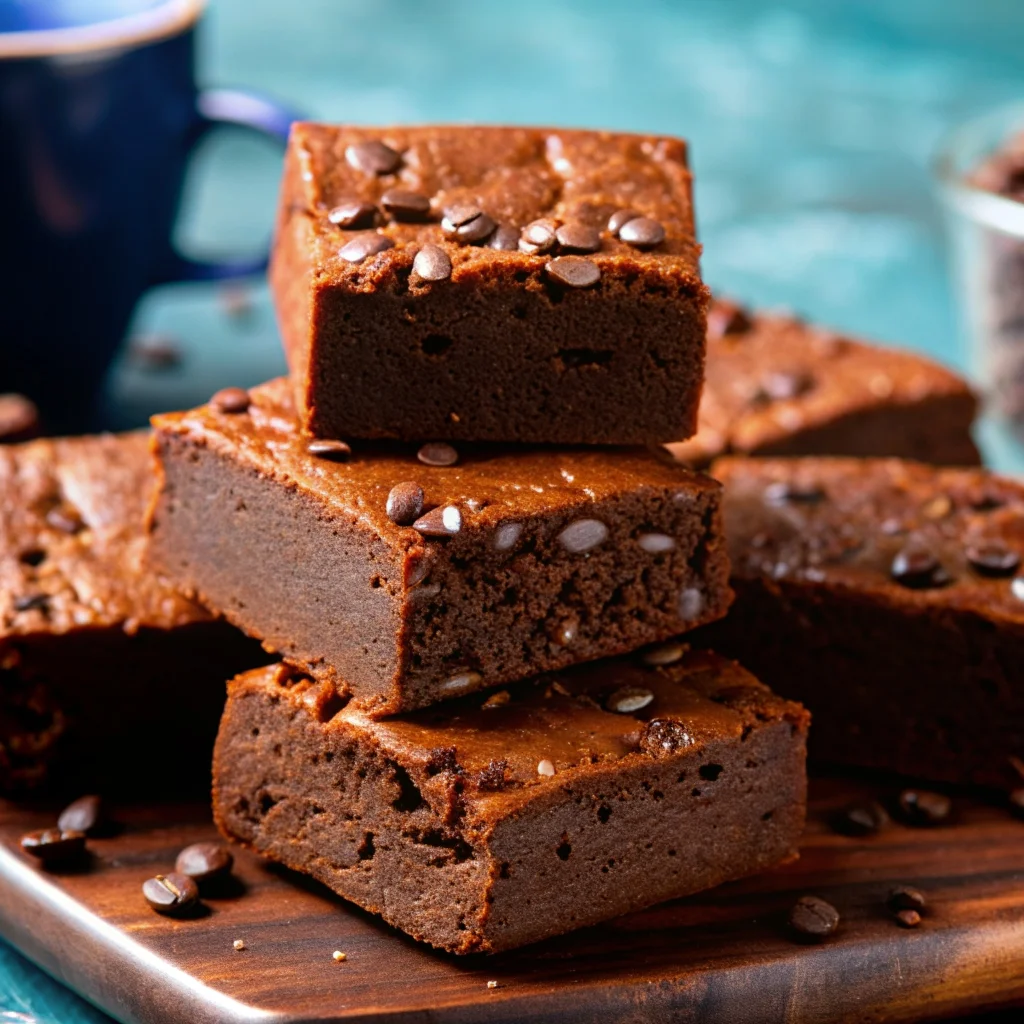
These espresso brownies are deeply chocolatey and boast the distinct flavour and aroma of good quality coffee. Coffee and chocolate have always made for a very special pairing, but to get espresso brownies right, the balance has to be enough that the coffee doesn’t just complement the chocolate, but shines through in its own right. These brownies do just that! I made these brownies for my head chef at a training course recently and he raved about them, calling them, “Just as a brownie should be”, so I can pretty confidently say that you’re going to love them too. With a gloriously fudgy texture, a crackly top, and the perfect balance of deep, dark chocolate and bold espresso, these are brownies for true connoisseurs. For another decadent coffee-infused treat, try our Coffee Chocolate Cake.
Why You’ll Love This Espresso Brownies Recipe
- Perfectly Balanced Flavor: The espresso doesn’t just complement the chocolate; it shines through, creating a sophisticated, complex taste.
- Incredibly Fudgy Texture: These brownies have that dense, moist, melt-in-your-mouth texture that brownie lovers crave.
- Simple, One-Bowl Method: Easy to whip up with minimal fuss and cleanup.
- Crowd-Pleasing Sophistication: A guaranteed hit with coffee enthusiasts and chocolate lovers alike.
- Perfect for Any Occasion: Elegant enough for dinner parties, yet simple enough for a cozy night in.
Your Simple Ingredients for the Perfect Espresso Brownies
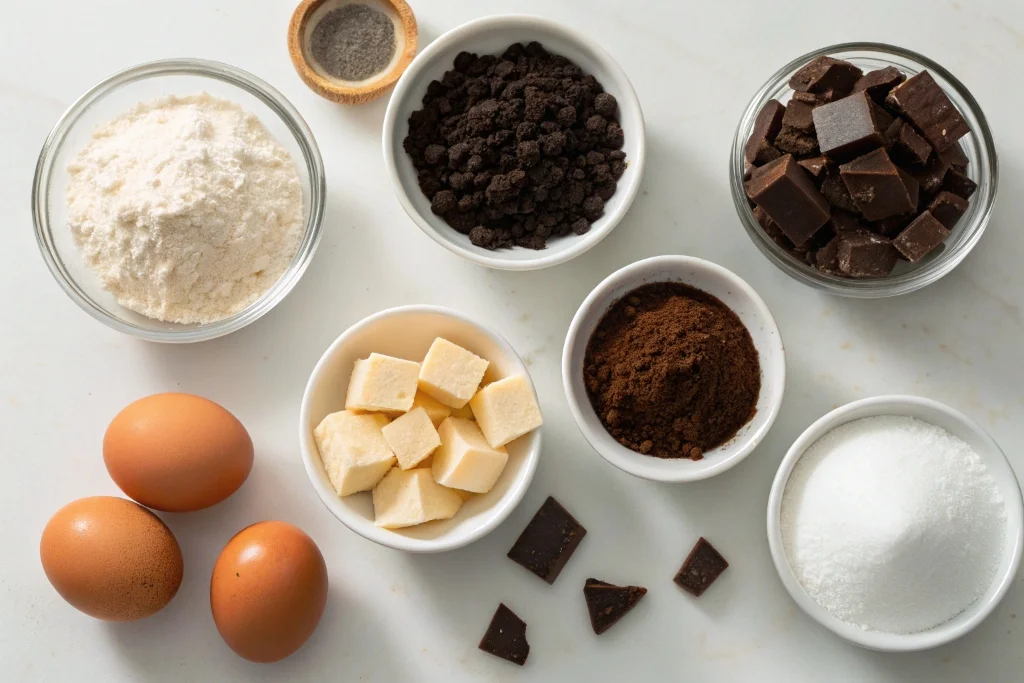
- 10 g (1 tbsp) espresso powder
- 400 g (14 oz) dark chocolate (bittersweet), chopped
- 280 g (2½ sticks) salted butter, cubed
- 450 g (2⅔ cups) soft light brown sugar
- 6 medium free-range eggs, room temperature, beaten
- 1 tbsp vanilla extract
- 170 g (1¼ cups) plain white flour (all-purpose flour)
- ½ tsp sea salt flakes
Pro Tip: The Secret to a Perfectly Fudgy Texture
The key to achieving that dense, fudgy, not-cakey brownie texture is to not overbake them. Bake just until the top is set and a skewer inserted into the center comes out with moist, sticky crumbs – not wet batter, but definitely not clean. The brownies will continue to set as they cool. Chilling them overnight in the fridge is also crucial for clean, perfect slices.
How to Make Perfect Espresso Brownies
Phase 1: Prep and Preheat
Prepare the Pan: Grease and line a 20cm x 28cm (8 inch x 11 inch) shallow rectangular cake tin with parchment paper, leaving an overhang on the long sides for easy removal.
Preheat Oven: Preheat your oven to 180°C/350°F (160°C/320°F fan) .
Prepare Espresso: In a small cup, mix the espresso powder with 60ml (4 tbsp) of boiling water. Stir until dissolved and set aside to cool.
Phase 2: Melt Chocolate and Butter
Melt Together: Place the cubed butter and chopped dark chocolate in a large, heatproof bowl. Gently melt until smooth. You can do this in the microwave in 30-second bursts, stirring well after each, or use a double boiler method (a bowl set over a pan of simmering water, making sure the bowl doesn’t touch the water).
Phase 3: Build the Brownie Batter
Add Sugar: Add the soft light brown sugar to the warm chocolate-butter mixture. Whisk it in thoroughly. The mixture will thicken – a slight graininess at this stage is fine.
Add Eggs and Flavor: Add the beaten eggs and stir with your whisk until incorporated. Then, pour in the cooled espresso mixture and the vanilla extract. Stir through until everything is well combined.
Add Flour: Sift the plain flour into the bowl. Using a spatula, gently fold it through until it is evenly combined and no streaks of flour remain. Be careful not to overmix.
Phase 4: Bake to Perfection
Pour and Top: Pour the brownie batter into the prepared tin and spread it into an even layer. Sprinkle the sea salt flakes evenly over the top.
Bake: Bake for 35-40 minutes, until the brownies are set all the way across the top. A skewer inserted into the center should come out with sticky crumbs attached, not wet batter.
Cool Completely: Place the tin on a wire rack and let the brownies cool completely in the tin.
Phase 5: Chill and Slice
Chill Overnight: Once completely cool, place the tin in the refrigerator to chill for at least 4 hours, but preferably overnight. This step is essential for achieving clean, neat slices.
Slice and Serve: Once thoroughly chilled, use the parchment overhang to lift the brownie block out of the tin. Place it on a cutting board and use a sharp, serrated knife to slice it into 15 neat brownies (a 5 x 3 pattern works well). Wipe the knife clean between cuts for the neatest edges.
Pro Tips & Easy Variations for Your Espresso Brownies
- Use Good Quality Chocolate: Since chocolate is the star, using a good quality dark chocolate (around 70% cocoa) will make a significant difference in the final flavor.
- Don’t Skip the Chill: For the fudgiest texture and the cleanest slices, do not skip the overnight chill. It transforms the brownies.
- Nutty Addition: Fold in 100g of chopped walnuts or pecans along with the flour for a delicious crunch.
- Swirl It: Before baking, dollop spoonfuls of creamy peanut butter or Nutella onto the batter and swirl with a knife for a marbled effect.
- Serving Suggestions: These brownies are divine on their own, but elevate them with a dollop of freshly whipped cream, a scoop of vanilla ice cream, or a handful of fresh raspberries.
Serving Suggestions for the Ultimate Coffee Dessert
These espresso brownies are wonderful in so many ways. Serve them in small squares as an elegant after-dinner treat with espresso or cappuccino. They’re perfect for bake sales, gift-giving, or simply as a sophisticated snack. For a truly indulgent dessert, serve them warm with a scoop of vanilla bean ice cream and a drizzle of warm chocolate sauce.
Nutrition Information
(Approximate per brownie, based on 15) Calories: 479, Fat: 28g, Carbohydrates: 51g, Protein: 6g, Sugar: 36g, Fiber: 3g. A rich, decadent treat.
Storage & Make-Ahead Instructions
- Store in an Airtight Container: Keep brownies in an airtight container at room temperature for up to 3 days, or in the refrigerator for up to a week.
- Freeze Beautifully: These brownies freeze exceptionally well. Wrap individual squares or the whole block tightly in plastic wrap, then foil, and freeze for up to 3 months. Thaw at room temperature.
Your Espresso Brownies Questions Answered
- Can I use instant coffee instead of espresso powder?
- You can, but the flavor will be less intense and distinct. Espresso powder is much more concentrated and provides that true coffee shop flavor. If using instant coffee, you may want to increase the amount slightly.
- My brownies turned out cakey instead of fudgy. What happened?
- Cakey brownies are usually the result of overmixing the batter after adding the flour, or overbaking. Mix just until the flour disappears, and be sure to pull them out of the oven when a skewer still comes out with sticky crumbs, not clean.
- Do I have to chill them overnight?
- For the best, fudgiest texture and the cleanest slices, yes, it’s highly recommended. The chilling time allows the brownies to set completely, making them much easier to cut and giving them that perfect, dense, fudgy bite.
- Can I use milk chocolate instead of dark?
- Dark chocolate is essential to balance the sweetness of the brown sugar and create a rich, not-too-sweet flavor. Milk chocolate would make them overly sweet and change the texture.
- Can I make these in a different sized pan?
- Yes, but the baking time will change. A different sized pan will result in a different thickness, so you’ll need to adjust the baking time accordingly and keep a close eye on them, using the skewer test to check for doneness.

More Incredible Coffee-Infused Dessert Recipes to Try
If you love this perfect pairing, you’ll adore our other coffee and chocolate creations. Our Coffee Chocolate Cake is a stunning layer cake.
The Story Behind This Perfectly Balanced Treat
Espresso Brownies are a beautiful testament to the magic of culinary balance. This recipe isn’t just about adding coffee to a brownie; it’s about achieving the perfect harmony where both flavors shine. The goal is for the espresso to not just complement the chocolate, but to stand proudly alongside it, adding its own distinct, aromatic character. The result is a brownie of incredible depth and sophistication – fudgy, rich, and deeply satisfying. It’s a dessert that proves that the most memorable treats often come from mastering the balance between two powerful, beloved flavors. This wonderfully perfected and delicious recipe is inspired by the version shared on A Mummy Too by Emily Leary.
Pin This Perfectly Balanced Recipe For Your Next Baking Project!
These espresso brownies will be a new favorite for any coffee lover. Save this image to your “Brownie Recipes” or “Coffee Desserts” Pinterest board so you always have this winner ready. Did you make these rich, fudgy brownies? We’d love to see your creation – tag us in your photos!

Espresso Brownies
Equipment
- 20cm x 28cm (8×11 inch) Rectangular Cake Tin The perfect size for these brownies.
- Large Heatproof Bowl For melting chocolate and mixing.
- Sharp Serrated Knife For slicing clean brownies.
Ingredients
- 10 g espresso powder (1 tbsp)
- 60 ml boiling water (4 tbsp)
- 400 g dark chocolate (bittersweet), chopped
- 280 g salted butter, cubed (2½ sticks)
- 450 g soft light brown sugar (2⅔ cups)
- 6 medium free-range eggs, room temperature, beaten
- 1 tbsp vanilla extract
- 170 g plain white flour (all-purpose, 1¼ cups)
- 0.5 tsp sea salt flakes
Instructions
- Grease and line a 20cm x 28cm (8×11 inch) rectangular cake tin with parchment paper. Preheat oven to 180°C/350°F (160°C fan).
- Mix espresso powder with 60ml boiling water and set aside to cool.
- In a large heatproof bowl, gently melt the butter and chopped dark chocolate together until smooth (microwave in 30-sec bursts or using a double boiler).
- Add the brown sugar and whisk in until combined. The mixture will thicken.
- Add the beaten eggs and stir to combine. Then add the cooled espresso and vanilla extract, and stir through.
- Sift the flour into the bowl and gently fold in with a spatula until just combined. Do not overmix.
- Pour batter into prepared tin and spread evenly. Sprinkle sea salt flakes on top.
- Bake for 35-40 minutes until set. A skewer should come out with sticky crumbs. Cool completely in the tin on a wire rack.
- Refrigerate overnight to firm up completely. Lift out, slice into 15 brownies with a sharp knife, and serve.


