Delicious Easy No-Bake Blueberry Cheesecake Bars Recipe In 240 Minutes!
Why I Created This No-Bake Blueberry Cheesecake Bars Recipe
It was one of those scorching summer afternoons where the last thing I wanted to do was heat up the kitchen. My family was begging for something sweet, but the thought of baking in that heat made me cringe. That’s when I remembered how much we all loved cheesecake, and I started brainstorming ways to make it without the oven. The idea of no-bake blueberry cheesecake bars was born, and I couldn’t wait to try it.
I raided my pantry for graham crackers, grabbed some cream cheese from the fridge, and tossed a handful of fresh blueberries into the mix. The process was so simple—just crushing the crackers, mixing the filling, and layering everything together. The hardest part was waiting for them to set in the fridge! When I finally sliced into the pan, the creamy texture and burst of blueberry flavor had everyone reaching for seconds. It was an instant hit, and I knew this recipe would become a staple.
Since that day, these no-bake blueberry cheesecake bars have been my go-to dessert for picnics, backyard barbecues, and even lazy Sunday afternoons. They’re light enough to enjoy in the heat but rich enough to satisfy any sweet tooth. Plus, they’re so easy to customize—swap the blueberries for strawberries or raspberries, or add a layer of lemon curd for extra zing. No matter how you make them, they’re always a crowd-pleaser.
5 Reasons You Will Love This No-Bake Blueberry Cheesecake Bars Recipe
First, they’re no-bake! That means no oven, no fuss, and no heating up your kitchen on a hot day. You can whip these up in minutes and let the fridge do the rest of the work. It’s the perfect solution for when you want dessert without the hassle.
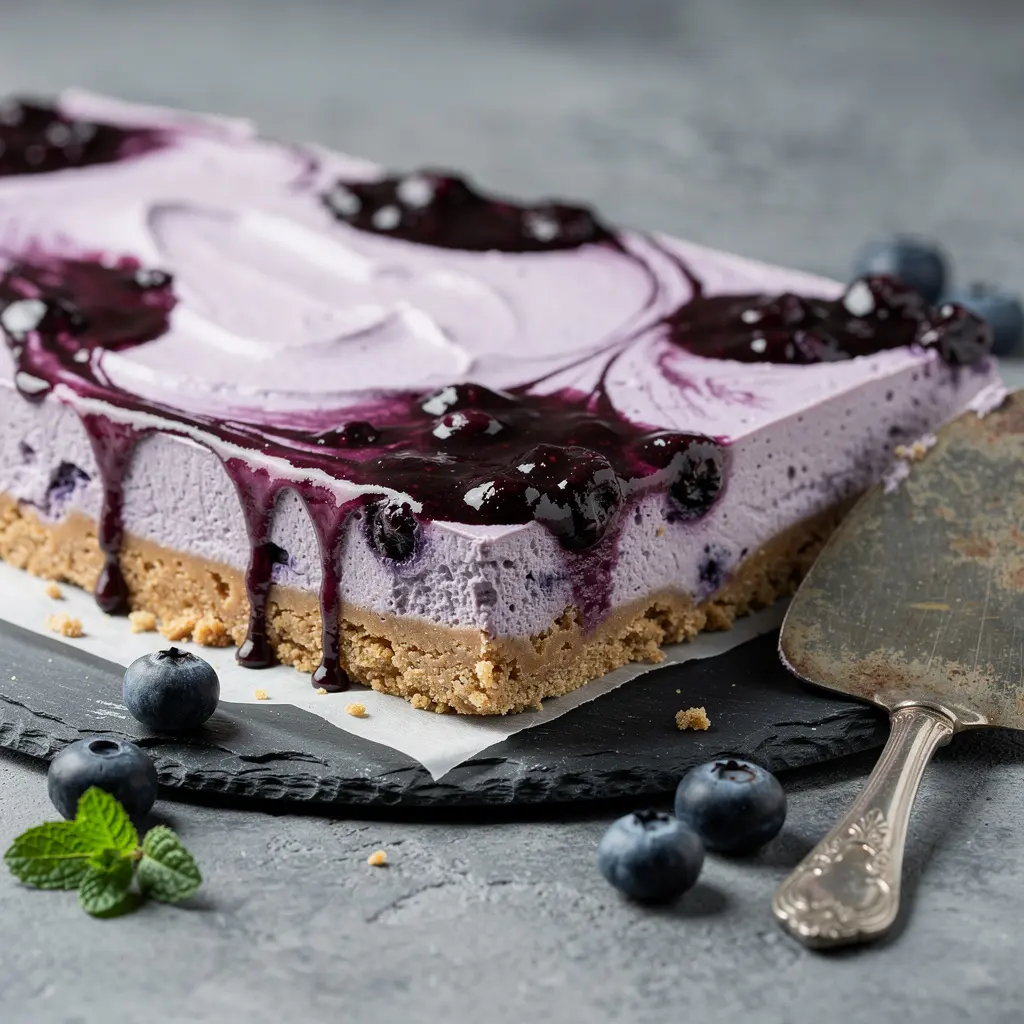
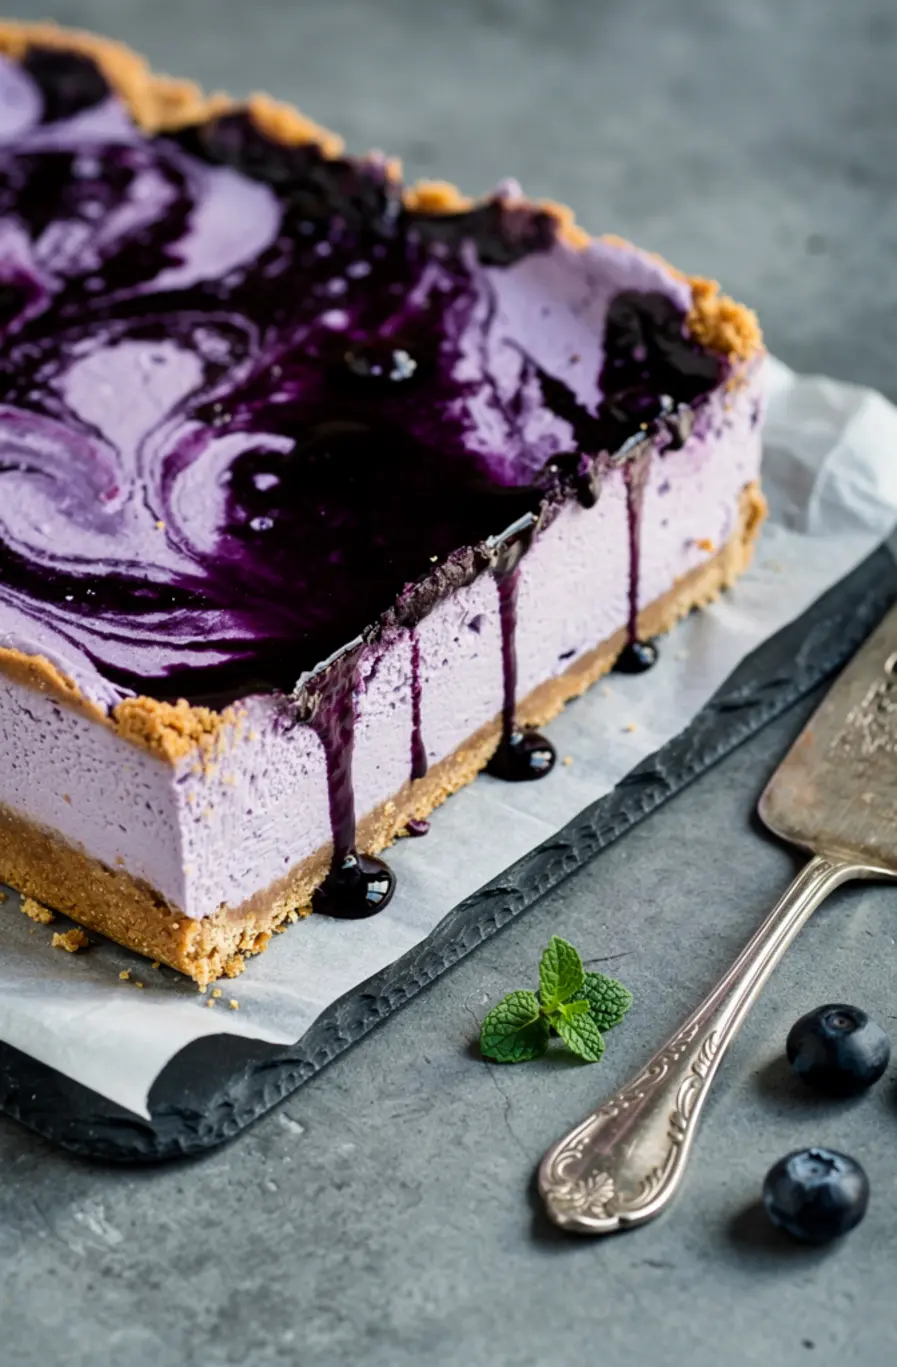
Second, the texture is absolutely divine. The graham cracker crust is buttery and crisp, while the cream cheese filling is smooth, creamy, and just the right amount of tangy. Topped with a sweet blueberry layer, every bite is a perfect balance of flavors and textures. It’s like eating a slice of cheesecake in bar form—without the fork!
Third, this recipe is incredibly versatile. While I love the classic blueberry version, you can easily swap in other fruits like raspberries, strawberries, or even a mix of berries. You can also play around with the crust—try using vanilla wafers or even gluten-free graham crackers if you need a gluten-free option. The possibilities are endless, so you can make these bars your own.
Fourth, they’re make-ahead friendly. These no-bake blueberry cheesecake bars need at least 4 hours to set, which makes them perfect for preparing ahead of time. Whether you’re hosting a party or just want to have dessert ready for the week, you can make these bars the night before and have them ready to go when you need them.
Fifth, they’re a guaranteed crowd-pleaser. There’s something about cheesecake that everyone loves, and these bars are no exception. They’re elegant enough for special occasions but simple enough for everyday indulgence. Trust me, once you serve these, you’ll be asked for the recipe again and again.
Ingredients for No-Bake Blueberry Cheesecake Bars Recipe
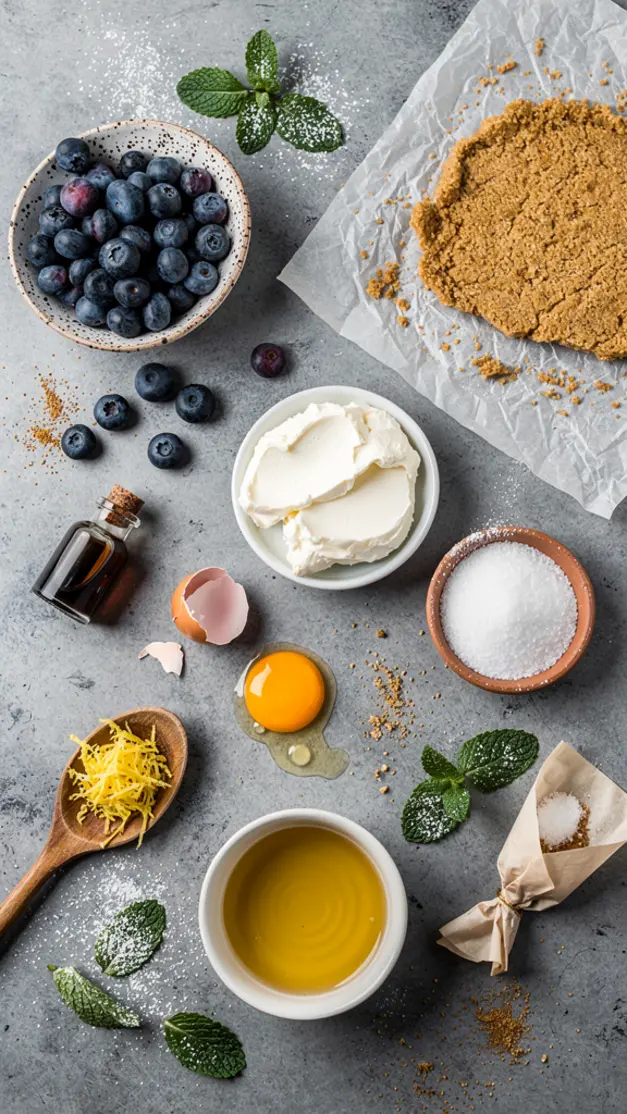
- 2 cups graham cracker crumbs
- 1/2 cup unsalted butter, melted
- 1/4 cup granulated sugar
- 24 oz cream cheese, softened to room temperature
- 1 cup powdered sugar
- 1 tsp vanilla extract
- 1 cup heavy whipping cream, cold
- 2 cups fresh blueberries
- 1/4 cup granulated sugar (for blueberry topping)
- 1 tbsp lemon juice
- 1 tbsp cornstarch
- 1 tbsp water
Substitutions: If you don’t have graham crackers, you can use digestive biscuits or vanilla wafers for the crust. For a lighter option, you can substitute the heavy cream with whipped topping, though the texture will be slightly different. If you’re avoiding dairy, you can try using dairy-free cream cheese and coconut cream, but I haven’t tested this variation myself. Fresh blueberries are ideal, but frozen will work in a pinch—just thaw and drain them first.
Tools You Need to Make No-Bake Blueberry Cheesecake Bars Recipe
- 9×13-inch baking pan
- Mixing bowls
- Electric mixer (hand or stand)
- Measuring cups and spoons
- Spatula
- Saucepan
- Whisk
- Plastic wrap
- Knife
How to Make No-Bake Blueberry Cheesecake Bars Recipe Step by Step
Step 1: Prepare the Crust
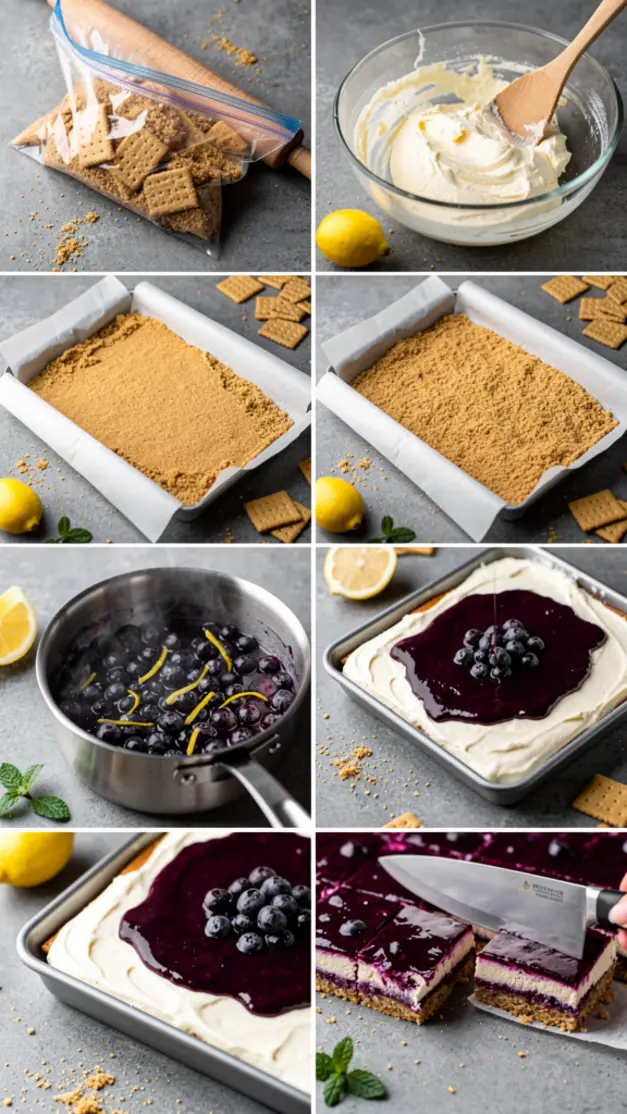
First, you’ll want to make the crust. In a mixing bowl, combine the graham cracker crumbs, melted butter, and 1/4 cup of granulated sugar. Stir everything together until the crumbs are evenly coated and the mixture looks like wet sand. Pour the crust mixture into a 9×13-inch baking pan and press it down firmly and evenly using the back of a spatula or your hands. Make sure the crust is compact so it holds together when you slice the bars later. Once the crust is pressed in, pop the pan into the fridge to chill while you work on the filling. This step is crucial—chilling the crust first helps prevent it from becoming soggy once the filling is added.
Step 2: Make the Cream Cheese Filling
Next, it’s time to make the creamy cheesecake layer. In a large mixing bowl, beat the softened cream cheese, powdered sugar, and vanilla extract together using an electric mixer. Start on low speed to avoid a powdered sugar cloud, then increase the speed to medium and beat until the mixture is smooth and creamy. This should take about 2-3 minutes. In a separate bowl, whip the cold heavy cream until stiff peaks form. Gently fold the whipped cream into the cream cheese mixture until everything is fully combined and no streaks remain. Be careful not to overmix, or the filling will lose its light, fluffy texture.
Step 3: Assemble the Bars
Now, take the chilled crust out of the fridge and spread the cream cheese filling evenly over the top. Use a spatula to smooth it out, making sure it reaches all the edges of the pan. Once the filling is in place, return the pan to the fridge to chill while you prepare the blueberry topping. This step ensures the filling starts to set before you add the final layer.
Step 4: Prepare the Blueberry Topping
In a saucepan, combine the fresh blueberries, 1/4 cup of granulated sugar, and lemon juice. Cook over medium heat, stirring occasionally, until the blueberries start to burst and release their juices. This should take about 5-7 minutes. In a small bowl, mix the cornstarch and water together to create a slurry, then stir it into the blueberry mixture. Continue cooking for another 2-3 minutes, stirring constantly, until the mixture thickens into a jam-like consistency. Remove the pan from the heat and let the blueberry topping cool slightly—it should be warm but not hot when you add it to the bars.
Step 5: Add the Blueberry Topping
Once the blueberry topping has cooled a bit, carefully spoon it over the cream cheese layer in the pan. Use the back of a spoon or a spatula to spread it evenly, making sure it covers the entire surface. You might have a little extra topping, which you can save to drizzle over individual servings later. Once the topping is in place, cover the pan with plastic wrap and return it to the fridge to chill for at least 4 hours, or until the bars are completely set.
Step 6: Slice and Serve
After the bars have chilled and set, it’s time to slice and serve them. Use a sharp knife to cut the bars into 16 even squares. For cleaner cuts, dip the knife in hot water and wipe it dry between each slice. Serve the bars chilled, straight from the fridge. If you have any leftovers, store them in an airtight container in the fridge for up to 5 days. These bars are best enjoyed cold, so there’s no need to reheat them—just grab and go!
My Pro Tips for the Best No-Bake Blueberry Cheesecake Bars Recipe
- Chill the crust first: I can’t stress this enough—chilling the crust before adding the filling is key to preventing it from becoming soggy. The crust needs time to firm up, so don’t skip this step. If you’re in a hurry, you can even pop it in the freezer for 15 minutes to speed things up.
- Use room temperature cream cheese: Cold cream cheese won’t blend smoothly, which can leave your filling lumpy. To avoid this, take the cream cheese out of the fridge about an hour before you start the recipe. If you forget, you can microwave it in 10-second intervals until it’s soft, but be careful not to melt it.
- Whip the cream to stiff peaks: The whipped cream adds lightness to the filling, so it’s important to whip it until it holds stiff peaks. If you under-whip it, the filling will be dense and heavy. If you over-whip it, the cream can turn grainy or even curdle. Keep an eye on it and stop as soon as it holds its shape when you lift the beaters.
- Let the bars set fully: While it’s tempting to dig in after an hour or two, these bars really need the full 4 hours to set properly. If you cut into them too soon, they’ll be soft and messy. If you’re short on time, you can make them the night before and let them chill overnight—they’ll be perfect by morning.
- Use fresh blueberries for the best flavor: Fresh blueberries have a brighter, sweeter flavor than frozen, and they hold their shape better when cooked. If you do use frozen blueberries, make sure to thaw and drain them first to avoid excess liquid in the topping. You can also strain the cooked blueberry mixture to remove any seeds or skins if you prefer a smoother texture.
Delicious Variations of No-Bake Blueberry Cheesecake Bars Recipe
- Raspberry or Strawberry Cheesecake Bars: Swap the blueberries for an equal amount of raspberries or strawberries. Both fruits work beautifully in this recipe and add a slightly different flavor profile. Raspberries are tart and tangy, while strawberries are sweeter and more mellow. You can even mix and match for a berry medley.
- Lemon Blueberry Cheesecake Bars: Add a layer of lemon curd between the cream cheese filling and the blueberry topping for an extra burst of citrusy flavor. The tartness of the lemon pairs perfectly with the sweet blueberries and creamy cheesecake. You can use store-bought lemon curd or make your own with lemon juice, sugar, eggs, and butter.
- Chocolate Graham Cracker Crust: For a chocolate twist, use chocolate graham crackers instead of regular ones for the crust. You can also add a layer of melted chocolate between the crust and the filling for an extra indulgent treat. If you’re feeling fancy, drizzle melted chocolate over the top of the bars before serving.
- Gluten-Free Cheesecake Bars: To make these bars gluten-free, use gluten-free graham crackers or another gluten-free cookie for the crust. Make sure all your ingredients, including the cornstarch, are certified gluten-free to avoid cross-contamination. The rest of the recipe stays the same, so you won’t miss out on any of the creamy goodness.
- Coconut Cheesecake Bars: Add a tropical twist by mixing 1/2 cup of shredded coconut into the crust mixture. You can also fold 1/2 cup of toasted coconut into the cream cheese filling for extra texture and flavor. Top the bars with the blueberry topping as usual, or swap it for a mango or pineapple compote for a truly tropical dessert.
What to Serve With No-Bake Blueberry Cheesecake Bars Recipe
These no-bake blueberry cheesecake bars are delicious on their own, but they also pair beautifully with a variety of sides and drinks. For a simple yet elegant presentation, serve them with a dollop of freshly whipped cream and a few extra blueberries on top. The extra cream adds a light, airy contrast to the rich bars, while the fresh berries enhance the blueberry flavor.
If you’re serving these bars at a brunch or dessert spread, consider pairing them with other fruity treats like a mixed berry salad or a citrusy fruit tart. The bright, fresh flavors will complement the creamy cheesecake bars perfectly. For a more decadent option, serve them alongside a scoop of vanilla ice cream or a drizzle of salted caramel sauce. The contrast of warm and cold, sweet and salty, is absolutely divine.
When it comes to drinks, these bars pair well with both coffee and tea. A hot cup of coffee or a refreshing iced tea cuts through the richness of the cheesecake, making each bite taste even better. For a boozy option, serve them with a glass of dessert wine like Moscato or a sweet sparkling wine. The bubbles and sweetness of the wine enhance the flavors of the bars, making them feel even more special.
How to Store Leftover No-Bake Blueberry Cheesecake Bars Recipe
These no-bake blueberry cheesecake bars store beautifully in the fridge, so you can make them ahead of time and enjoy them throughout the week. To keep them fresh, store the bars in an airtight container with layers separated by parchment paper. This prevents them from sticking together and keeps the crust from becoming soggy. They’ll stay fresh in the fridge for up to 5 days, though I doubt they’ll last that long!
If you want to freeze these bars for longer storage, they freeze surprisingly well. Wrap each bar individually in plastic wrap, then place them in a freezer-safe container or bag. They’ll keep in the freezer for up to 3 months. When you’re ready to enjoy them, let them thaw in the fridge overnight. They won’t be quite as creamy as when they’re fresh, but they’ll still be delicious. Avoid freezing the bars with the blueberry topping if you can—it’s best to add the topping fresh when you’re ready to serve.
These bars are best served chilled, so there’s no need to reheat them. If you prefer them slightly colder, you can pop them in the freezer for 10-15 minutes before serving. This is especially nice on a hot day when you want a refreshing treat. Just don’t leave them in the freezer too long, or they’ll become too hard to enjoy.
Frequently Asked Questions About No-Bake Blueberry Cheesecake Bars Recipe
- Can I use frozen blueberries instead of fresh? Yes, you can use frozen blueberries in this recipe, but there are a few things to keep in mind. First, thaw and drain the blueberries before using them to avoid excess liquid in the topping. Second, frozen blueberries can bleed more than fresh ones, which might turn your topping a slightly different color. If you’re okay with that, go ahead and use them—just be sure to cook them down until they’re soft and jammy.
- Can I make these bars without a mixer? While an electric mixer makes the process easier, you can absolutely make these bars without one. For the crust, just use a fork or your hands to mix the ingredients together. For the filling, use a whisk to beat the cream cheese and powdered sugar until smooth, then whip the cream by hand using a whisk or a large fork. It’ll take a bit more elbow grease, but the results will be just as delicious.
- Why did my filling turn out lumpy? Lumpy filling is usually a sign that the cream cheese wasn’t softened enough before mixing. To avoid this, make sure your cream cheese is at room temperature before you start. If you forget to take it out of the fridge ahead of time, you can soften it in the microwave in 10-second intervals, but be careful not to melt it. Once it’s soft, beat it well with the powdered sugar and vanilla until smooth before adding the whipped cream.
- Can I use a different type of fruit for the topping? Absolutely! This recipe is very versatile, and you can swap the blueberries for almost any other fruit. Raspberries, strawberries, blackberries, and even peaches work beautifully. Just adjust the sugar and cornstarch as needed—some fruits are sweeter or juicier than others, so you might need to tweak the recipe slightly. For example, strawberries are sweeter than blueberries, so you might want to reduce the sugar in the topping.
- How do I know when the bars are fully set? The bars are fully set when the filling is firm to the touch and doesn’t jiggle when you gently shake the pan. If you’re unsure, you can test one bar by cutting into it—if it holds its shape and doesn’t ooze, it’s ready. If the filling is still soft, give it more time in the fridge. Remember, these bars need at least 4 hours to set, but overnight is even better.
- Can I make these bars in a different pan size? You can, but you’ll need to adjust the recipe accordingly. If you use an 8×8-inch pan, the bars will be thicker, so you might need to increase the chilling time to ensure they set properly. If you use a larger pan, like a 9×13-inch, the bars will be thinner, but they’ll still taste delicious. Just keep an eye on the chilling time—thinner bars might set faster than thicker ones.
The Story Behind My No-Bake Blueberry Cheesecake Bars Recipe
I’ll never forget the first time I made these no-bake blueberry cheesecake bars. It was a sweltering July afternoon, and my kids were bouncing off the walls, begging for something sweet. The last thing I wanted to do was turn on the oven, so I started brainstorming no-bake dessert ideas. I had a box of graham crackers in the pantry, a block of cream cheese in the fridge, and a pint of fresh blueberries I’d picked up at the farmers’ market that morning. It was like the universe was telling me to make cheesecake bars.
I crushed the graham crackers, mixed them with melted butter and sugar, and pressed the mixture into a pan. While the crust chilled, I whipped up the cream cheese filling, folding in freshly whipped cream for a light, airy texture. The blueberry topping was the easiest part—just a quick simmer on the stove, and it was ready to go. I layered everything together, popped the pan in the fridge, and crossed my fingers that it would turn out okay.
Four hours later, I sliced into the pan, and my kids gathered around, eyes wide with anticipation. The first bite was pure magic—the buttery crust, the creamy filling, the sweet-tart blueberry topping. It was everything I’d hoped for and more. My daughter declared it the “best dessert ever,” and my son asked if we could make it every week. From that day on, these no-bake blueberry cheesecake bars became a family favorite, and I’ve made them countless times since.
What I love most about this recipe is how adaptable it is. Over the years, I’ve experimented with different fruits, crusts, and even added layers of chocolate or caramel. Each variation brings something new to the table, but the original blueberry version remains my go-to. It’s the perfect dessert for summer, but honestly, I make it year-round because it’s just that good. Whether I’m bringing it to a potluck, serving it at a holiday gathering, or just treating myself after a long day, these bars never disappoint.
Pin This No-Bake Blueberry Cheesecake Bars Recipe for Later
I hope you love these no-bake blueberry cheesecake bars as much as my family and I do. They’re the perfect blend of creamy, tangy, and sweet, and they come together with minimal effort. Whether you’re making them for a special occasion or just because you’re craving something delicious, this recipe is sure to become a favorite in your household too.
If you try this recipe, I’d love to hear how it turns out! Leave a comment below and let me know what you think. And if you’re anything like me, you’ll want to make these bars again and again, so be sure to save this recipe for later. Happy baking—or in this case, happy no-baking!

No-Bake Blueberry Cheesecake Bars Recipe
Ingredients
- 1.5 cups graham cracker crumbs
- 1/3 cup unsalted butter, melted
- 1/4 cup granulated sugar
- 16 oz cream cheese, softened
- 1 cup powdered sugar
- 1 tsp vanilla extract
- 1 cup heavy whipping cream
- 1.5 cups fresh blueberries
- 1/4 cup granulated sugar (for blueberry swirl)
- 1 tbsp lemon juice
- 1 tsp cornstarch
- 1 tbsp water
Instructions
- Prep the Crust: In a medium bowl, mix graham cracker crumbs, melted butter, and 1/4 cup granulated sugar until well combined. Press the mixture evenly into the bottom of a 9x9-inch baking dish lined with parchment paper. Chill in the refrigerator for 15 minutes.
- Make the Filling: In a large bowl, beat the cream cheese, powdered sugar, and vanilla extract until smooth and creamy. In a separate bowl, whip the heavy whipping cream until stiff peaks form. Gently fold the whipped cream into the cream cheese mixture until fully combined.
- Assemble the Bars: Spread the cream cheese mixture evenly over the chilled crust. Smooth the top with a spatula.
- Prepare Blueberry Swirl: In a small saucepan, combine blueberries, 1/4 cup granulated sugar, lemon juice, cornstarch, and water. Cook over medium heat, stirring frequently, until the mixture thickens (about 5-7 minutes). Let it cool slightly, then blend until smooth. Strain to remove any skins.
- Add Swirl to Bars: Drop spoonfuls of the blueberry mixture onto the cream cheese layer. Use a knife or skewer to swirl the blueberry mixture into the cream cheese layer.
- Chill: Cover the dish with plastic wrap and refrigerate for at least 4 hours, or until firm.
- Serve: Once chilled, lift the bars out of the dish using the parchment paper. Cut into squares and serve.